Before you start
This guide assumes:
- macOS 13 (Ventura) or later.
- Xcode 15+ installed and command-line tools available. Xcode 16+ is recommended.
- A terminal that handles 256-color output. iTerm2, Warp, Ghostty, and Terminal.app on macOS Sonoma+ all qualify.
- Either an existing Xcode project to drive, or an empty folder you want to start a new project in. Both flows are covered below.
By the end you'll have a working flowdeck command, an active trial (the TUI will guide you through it on first launch), and a feel for the interactive TUI you'll use day to day, plus AI agent skills installed if you want them.
Step 01
Install and launch FlowDeck
FlowDeck installs as a single binary into ~/.local/bin/ and pulls in the iOS automation frameworks it depends on. The installer is non-interactive and idempotent; re-running it upgrades in place.
curl -sSL https://flowdeck.studio/install.sh | shOnce the installer finishes, verify the binary is on your PATH:
flowdeck --versionSuccess looks like a single line: flowdeck X.Y.Z. If you see that, the install worked.
Most shells need ~/.local/bin on the PATH before they'll find flowdeck. Add it and restart your terminal:
echo 'export PATH="$HOME/.local/bin:$PATH"' >> ~/.zshrcSwap ~/.zshrc for ~/.bashrc, ~/.config/fish/config.fish, or whatever your shell uses.
Switch into your project's directory (or an empty folder you want to scaffold a project in) and launch the interactive mode:
cd /path/to/your/project
flowdeck -i
On first launch, the TUI walks you through trial activation (email + 6-digit code), or you can paste an existing license key. Takes under a minute.
Step 02
Starting a project, new or existing
What happens after you run flowdeck -i depends on what's in the directory:
- Existing project with
.xcodeprojor.xcworkspace→ setup assistant picks the project and scheme, writes.flowdeck/config.json, then drops to the main view. - New project from an empty folder → new-project wizard scaffolds the project, then drops to the main view.
Both paths end on the main view. Subsequent launches skip the wizard and land directly there.
FlowDeck writes a .flowdeck/config.json in your project root once the setup wizard finishes. It stores your workspace, scheme, simulator or device, and build configuration so subsequent flowdeck commands don't need flags. Safe to commit or to .gitignore, whichever your team prefers.
Path A, Existing project
If the directory contains an Xcode project or workspace but no .flowdeck/config.json, the TUI runs a short setup assistant.
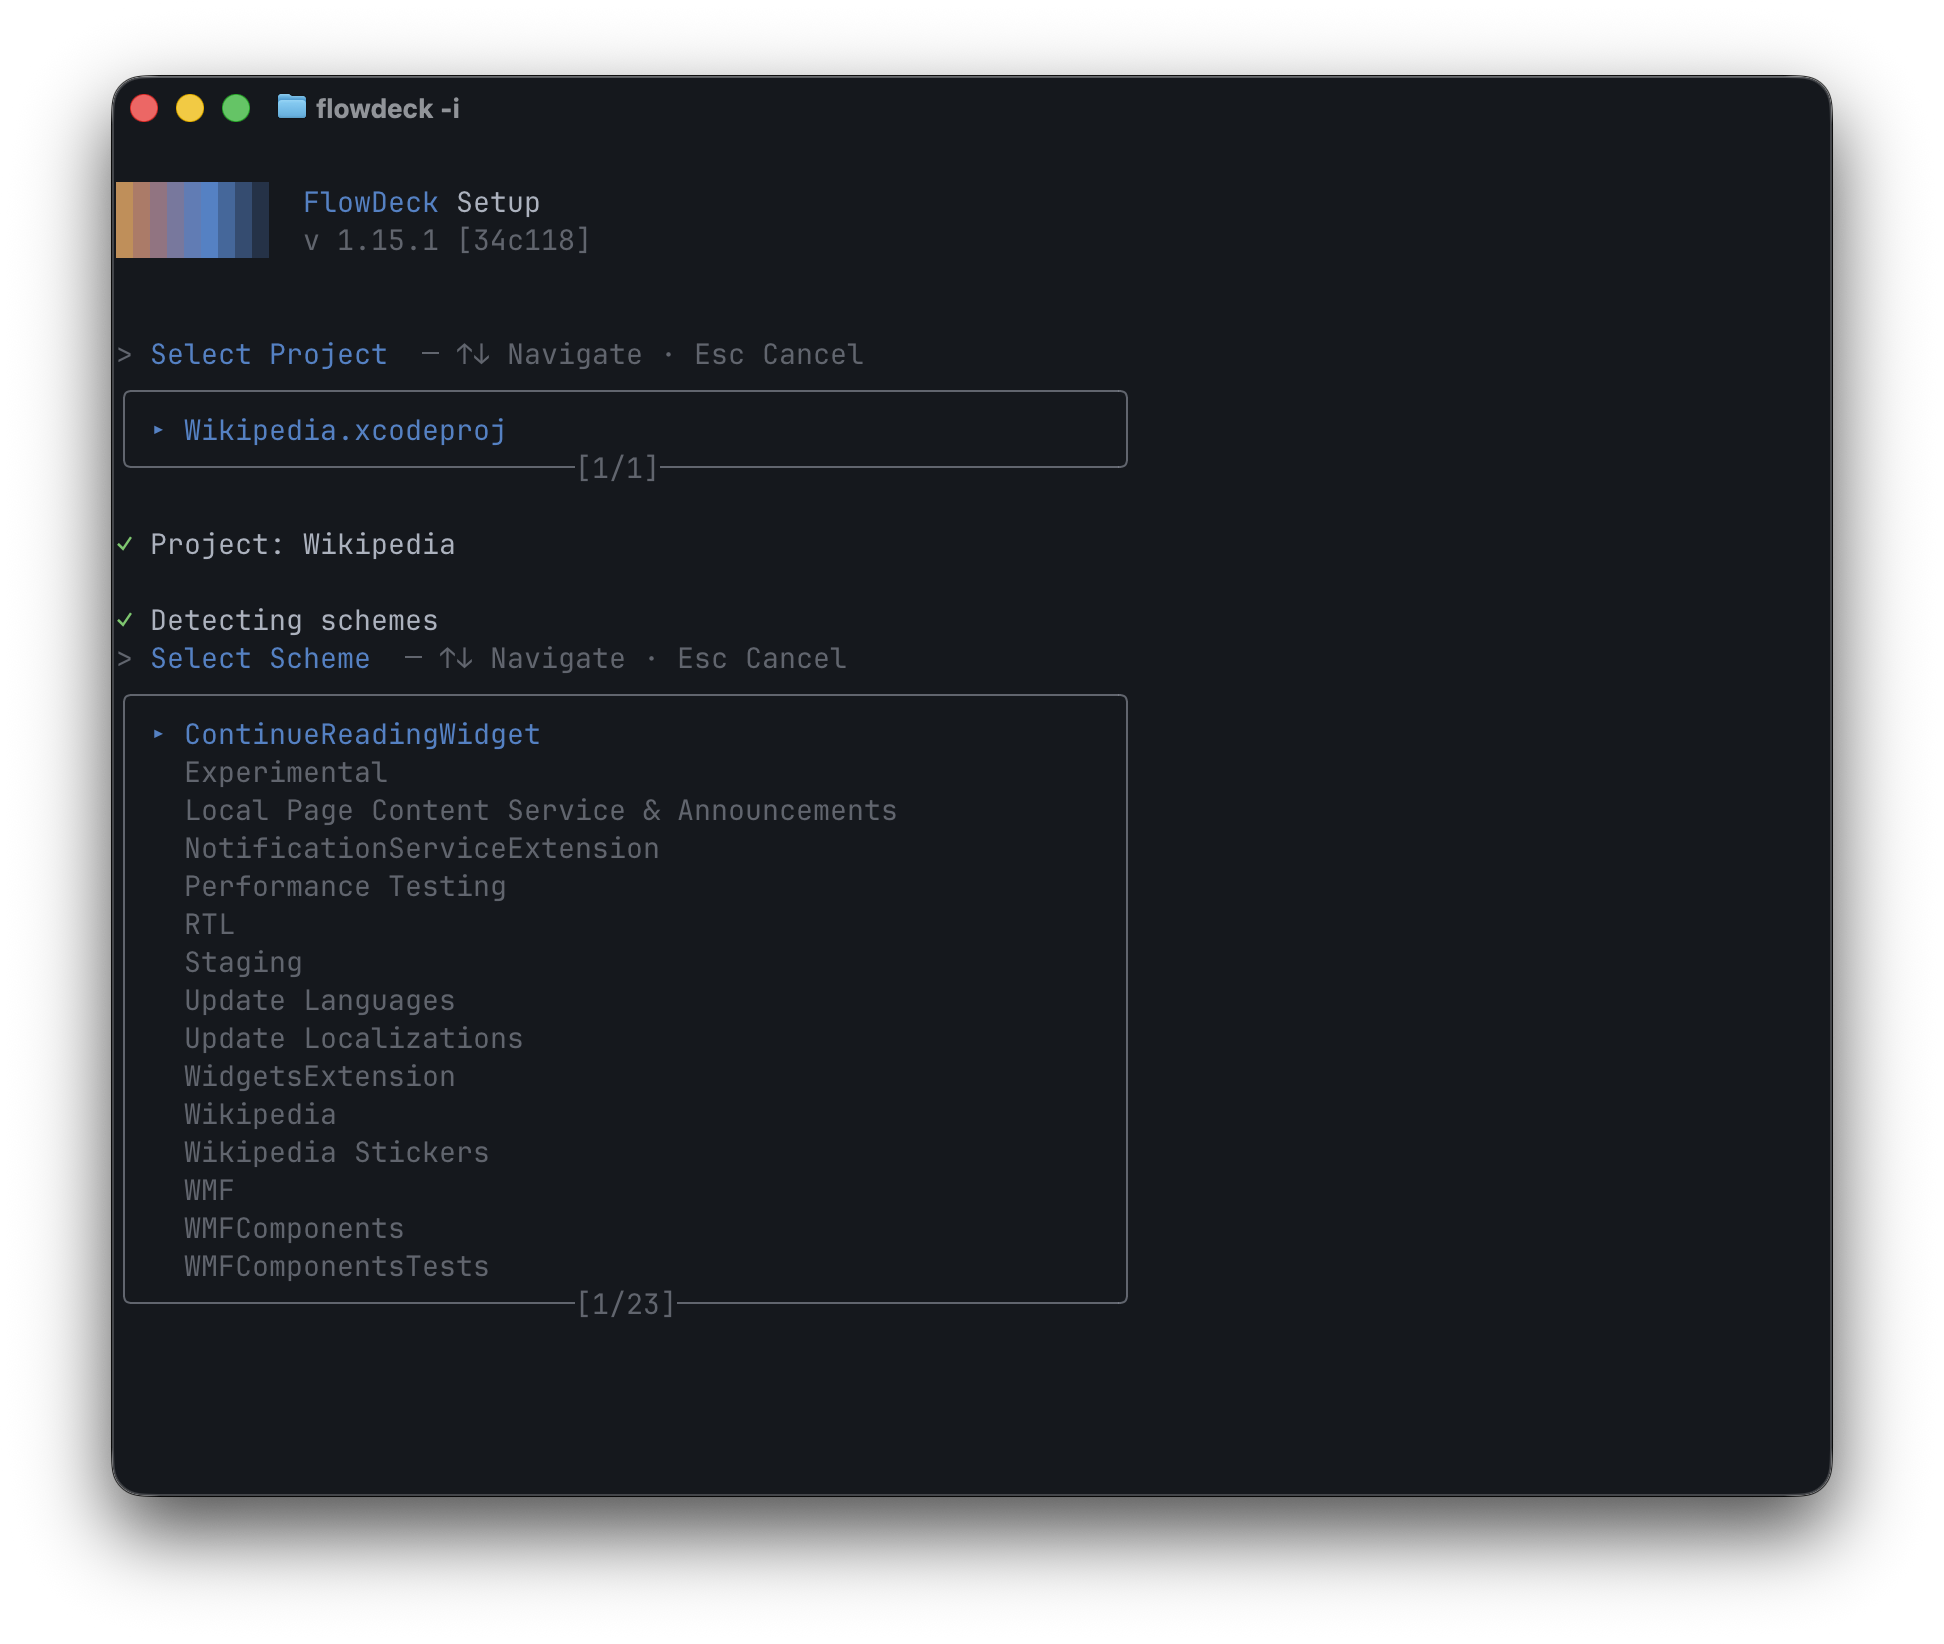
.xcodeproj and .xcworkspace, asks you to pick one, then lists every scheme so you can pick the one to drive.The assistant walks through two decisions:
- Select Project, every workspace and project in the current directory. For most repos this is a one-item list; monorepos with multiple projects get a real choice here. Arrow keys to navigate, Enter to confirm.
- Select Scheme, every scheme in the chosen project (FlowDeck parses these directly from the project file, no build needed). Pick the scheme you'll iterate against. You can change this later with S from the main view.
When you confirm, FlowDeck writes .flowdeck/config.json and transitions to the main view. To re-run the assistant, delete .flowdeck/config.json, or press W (workspace) and S (scheme) inside the TUI to change selections without leaving the build view.
Path B, New project
If the directory is empty (no .xcodeproj, no .xcworkspace), the TUI opens the new-project wizard instead.
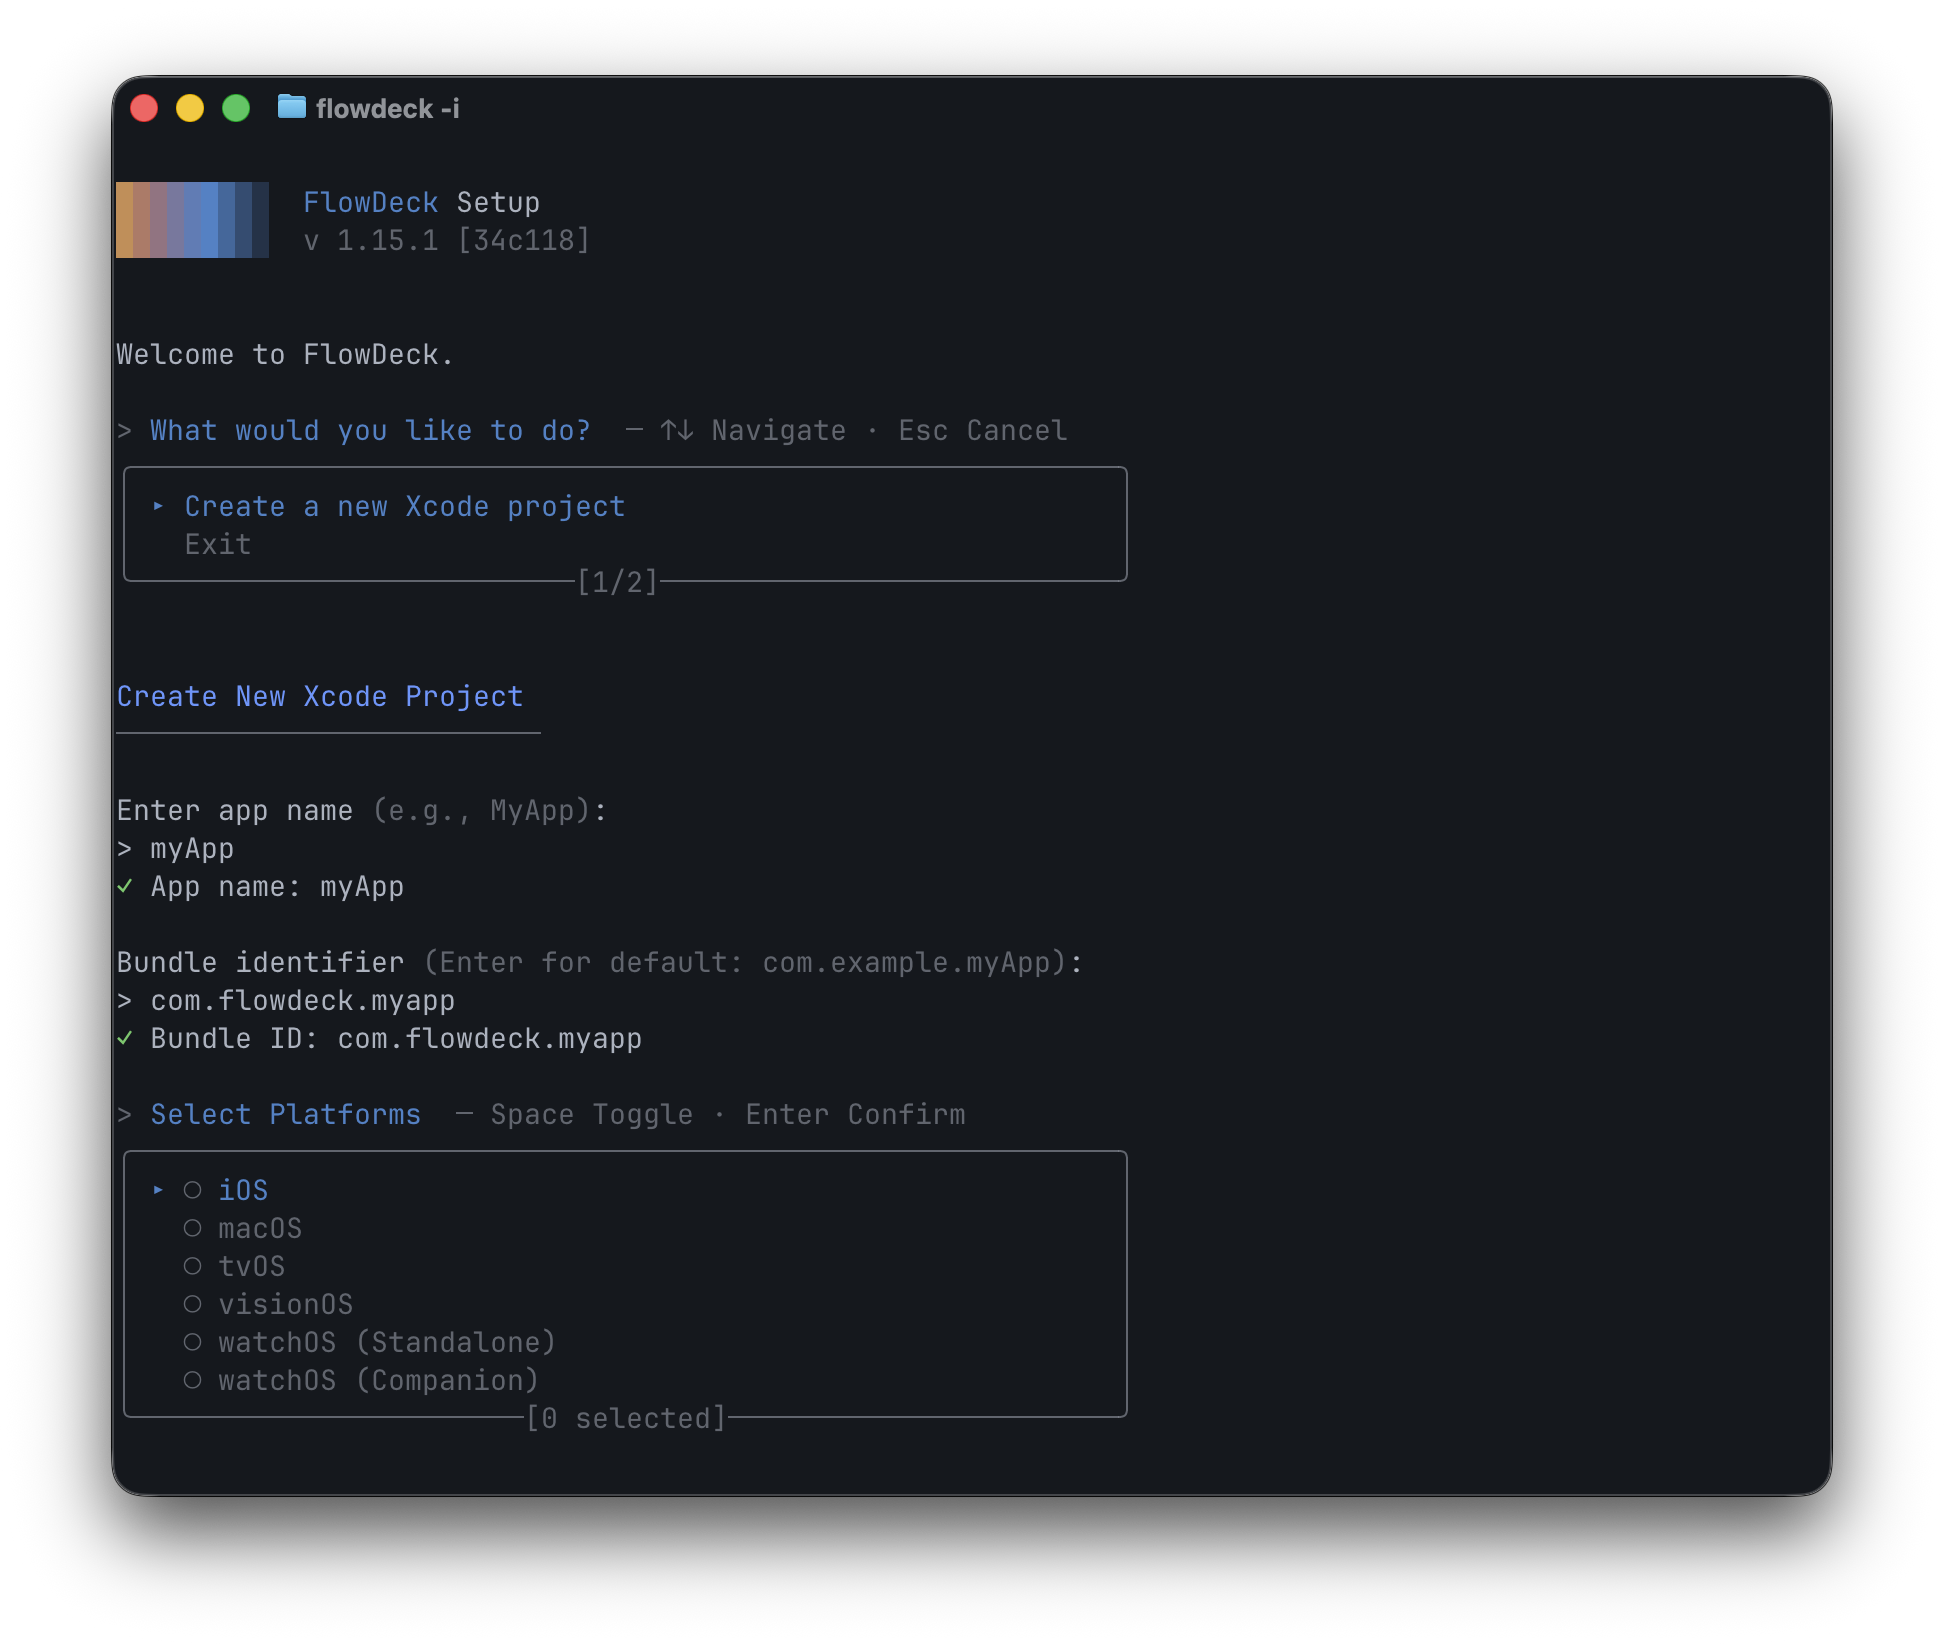
The wizard walks through four decisions:
- App name, your
.xcodeprojfilename (without the extension). Example:MyApp. - Bundle identifier, defaults to
com.example.<appname>. Override to your team's reverse-domain identifier. - Platforms, multi-select. Pick any of iOS, macOS, tvOS, visionOS, watchOS (Standalone), or watchOS (Companion). Space toggles a platform; Enter confirms the selection.
- Deployment target, defaults to the current OS major (e.g., iOS 26.0). Accept or override.
When you confirm, the wizard runs flowdeck project create under the hood and scaffolds the project files into the current directory. The TUI then transitions to the main view, now backed by your new project.
Step 03
Build, run, test, stop
The Build, Run & Test card is the day-to-day surface. The keys you'll press most:
- R, Run. Builds (if needed), installs, and launches the app on the current Device / Simulator.
- T, Test. Opens the test runner; picks up the current scheme's test target.
- L, Logs. Streams the running app's logs (your
print()calls andOSLogoutput). - X, Stop. Terminates the running app cleanly.
- C, Clean. Cleans the current build artifacts (with options for DerivedData and Xcode caches in the submenu).
- Z, Uninstall. Removes the app from the target.
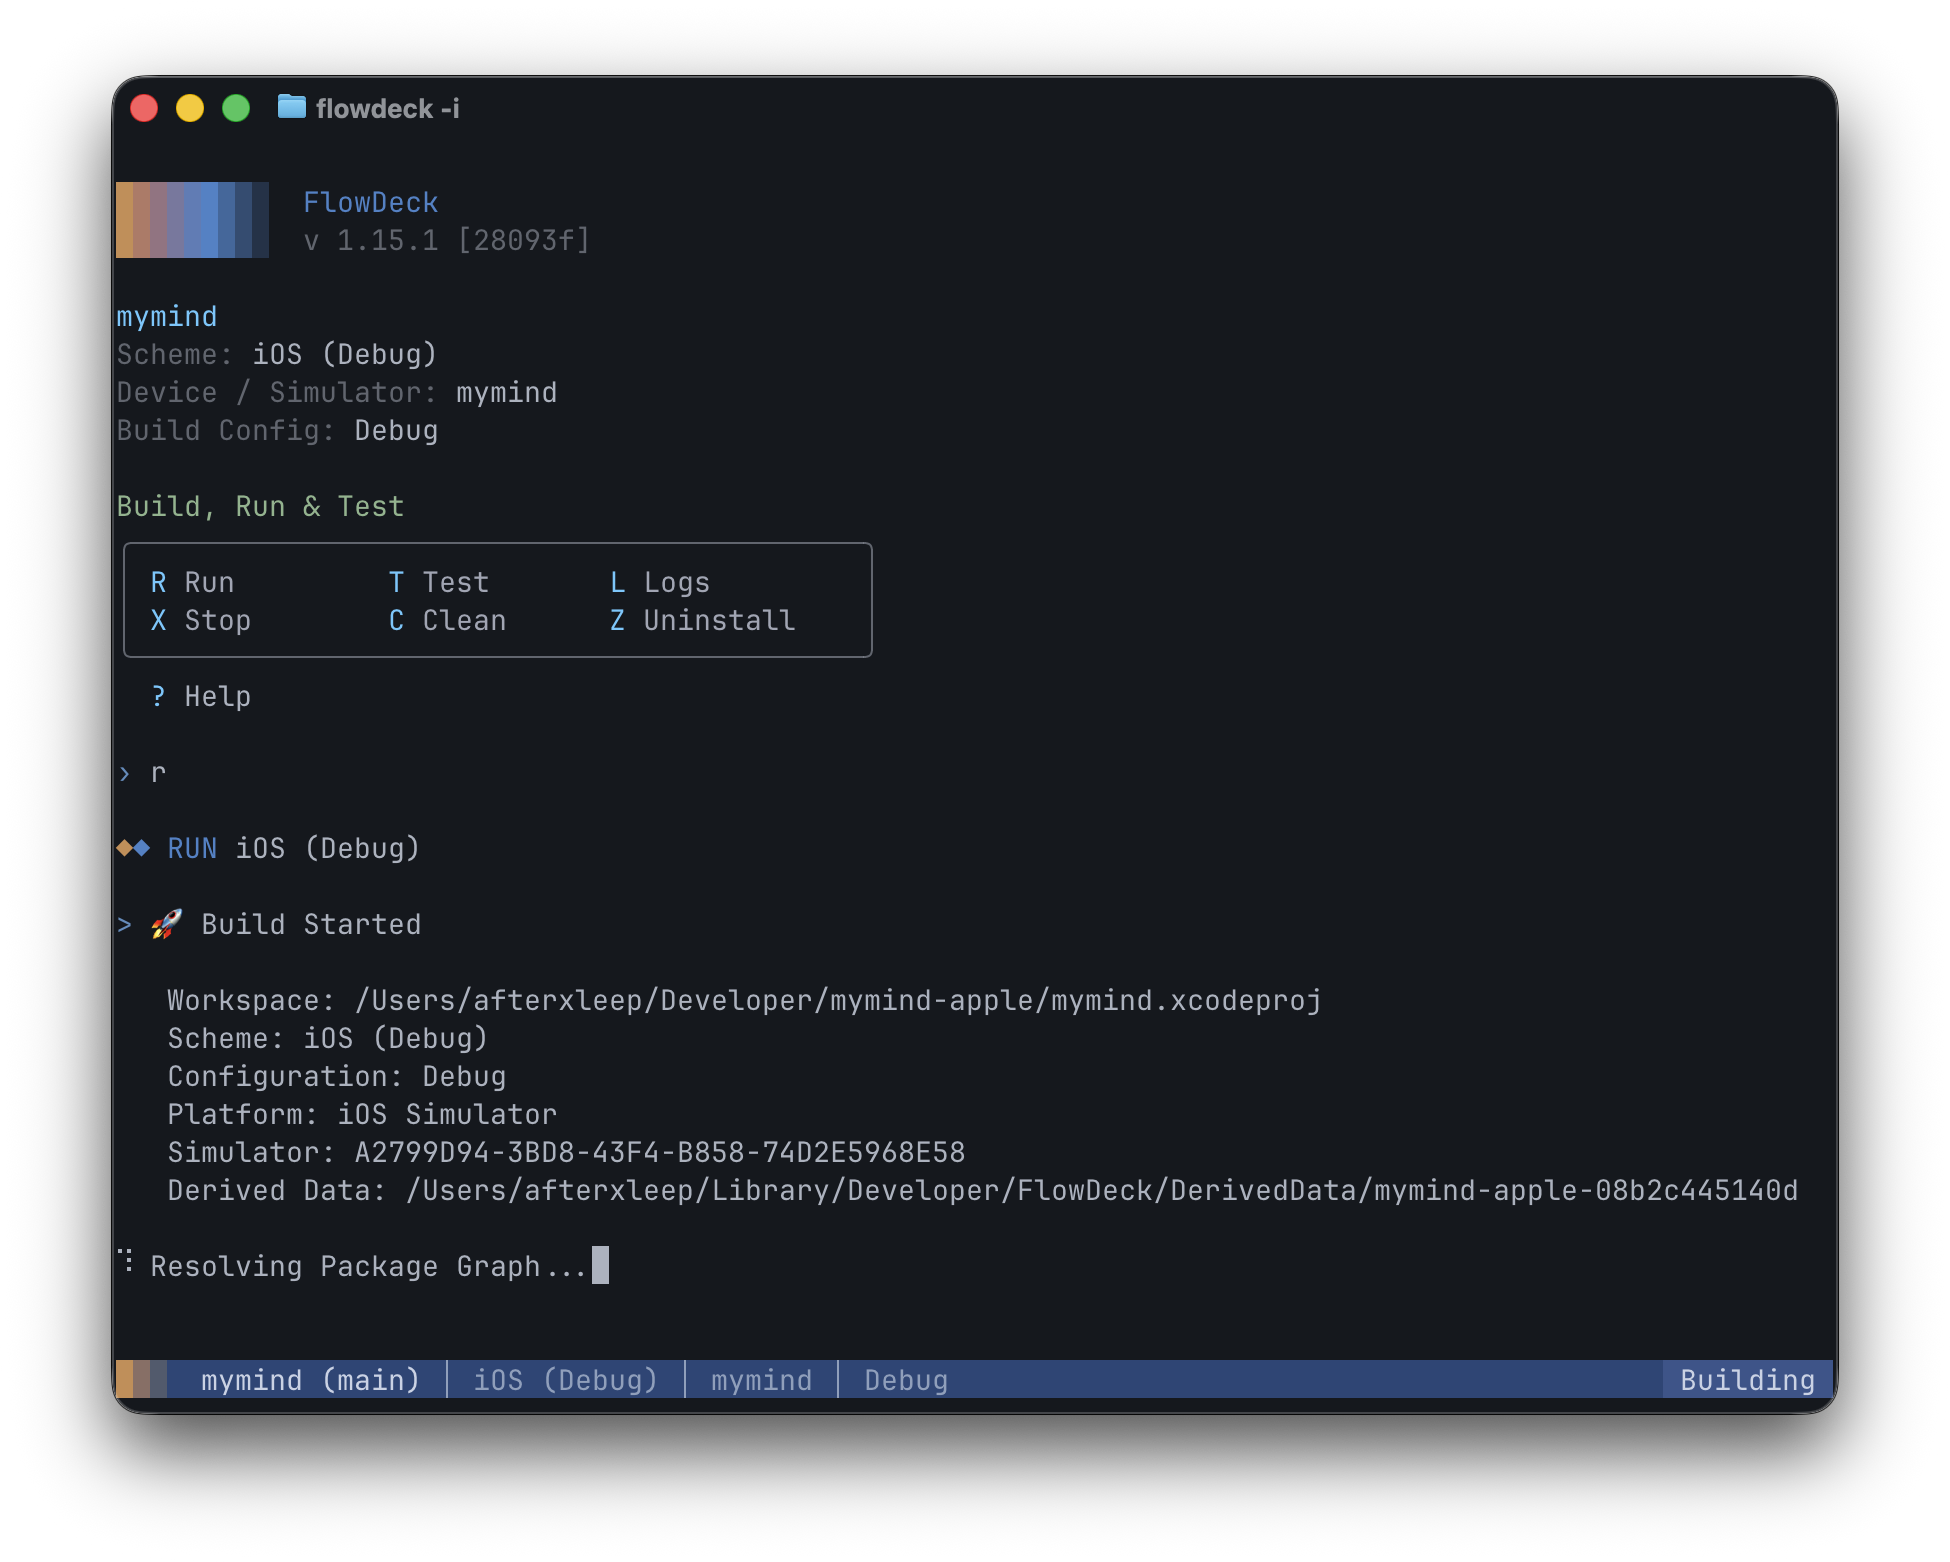
Build Started panel records what's running, workspace, scheme, configuration, platform, simulator UDID, DerivedData path. The line below it updates live (Resolving Package Graph, Compiling, Linking, Installing, Launching), and the bottom status bar mirrors the state (Building, Running, etc.) at a glance.Two less-common variants live just below the card in the help menu:
- B, Build without running. Useful when you want a fresh binary but not to launch yet.
- ⇧R (Shift+R), Run without building. Re-launches the existing build, skipping the compile step. Useful when iterating on launch arguments or environment.
Step 04
Install AI agent skills
Press A to open AI Settings. The flow is two steps: pick Install Skills or Uninstall Skills, then multi-select the agents to apply the change to.
![AI Settings inside the FlowDeck TUI. The main view (project info, Build/Run/Test card) stays at the top. Below, an AI Settings menu lists two options, Install Skills (highlighted) and Uninstall Skills, with a 1/2 paginator. Underneath, a Select Agents to Install multi-select lists Codex, Claude, OpenCode, Cursor, and Gemini with empty checkboxes, with the footer showing Space Toggle, Enter Confirm, and [0 selected].](/assets/images/guides/tui/08-ai-settings.png)
The two decisions:
- Install Skills or Uninstall Skills. Arrow keys to navigate, Enter to confirm.
- Select Agents, multi-select. Space toggles each agent (Codex, Claude, OpenCode, Cursor, Gemini). The footer counter shows how many you've selected. Enter applies the install or uninstall to every selected agent.
The skill packs include the FlowDeck command reference and workflow patterns the agent uses to drive build, run, test, log streaming, and UI automation. Installs write to each agent's standard skills directory (e.g. ~/.claude/skills/flowdeck/ for Claude). After install, restart your agent so the new files load; the AI agents setup guide covers verification and next steps.
When things go wrong
command not found: flowdeck~/.local/binisn't on yourPATH. Add it to your shell rc file:export PATH="$HOME/.local/bin:$PATH", then start a new terminal session.- The TUI looks garbled or characters render as boxes
- Your terminal isn't handling UTF-8 box-drawing characters or 256-color output. Switch to iTerm2, Warp, Ghostty, or modern Terminal.app. If you must use a basic terminal, set
TERM=xterm-256colorin your shell before launching. - Single-key shortcuts don't fire
- Usually a terminal multiplexer (tmux, screen) intercepting the keys. Either run the TUI outside the multiplexer or rebind the conflicting prefix.
- Empty-folder launch doesn't open the new-project wizard
- The folder isn't actually empty (a hidden file like
.DS_Storedoesn't count, but a stray.xcodeprojin a sibling directory might). Confirm withls -la. The wizard only opens when FlowDeck finds no project files in the current directory. - "License required" mid-trial
- Run
flowdeck license statusto see what happened. If your trial state was lost, re-run the trial activation flow:flowdeck license trial start --name "Your Name" --email you@example.com, thenflowdeck license trial verify --pending-id <id> --code <code>. If your trial has actually expired, the status output will say so and point at the upgrade flow.
Read next
Further reading
- Advanced interactive mode, logs, tests, on-the-fly settings, and simulator management in the TUI.
- Basic CLI commands, the same workflows from any shell, with structured JSON output.
- Automate iOS builds for CI and local dev, when you are ready to script the workflow.
- iOS simulator management, the deep dive on what makes
simulator boot "iPhone 16"reliable. - Full CLI reference, in the FlowDeck docs.